diumenge, 29 de desembre del 2013

Guarniments de Nadal / Christmas ornaments

Si, si... ja ho sé... potser és una mica tard per parlar dels guarniments de Nadal...

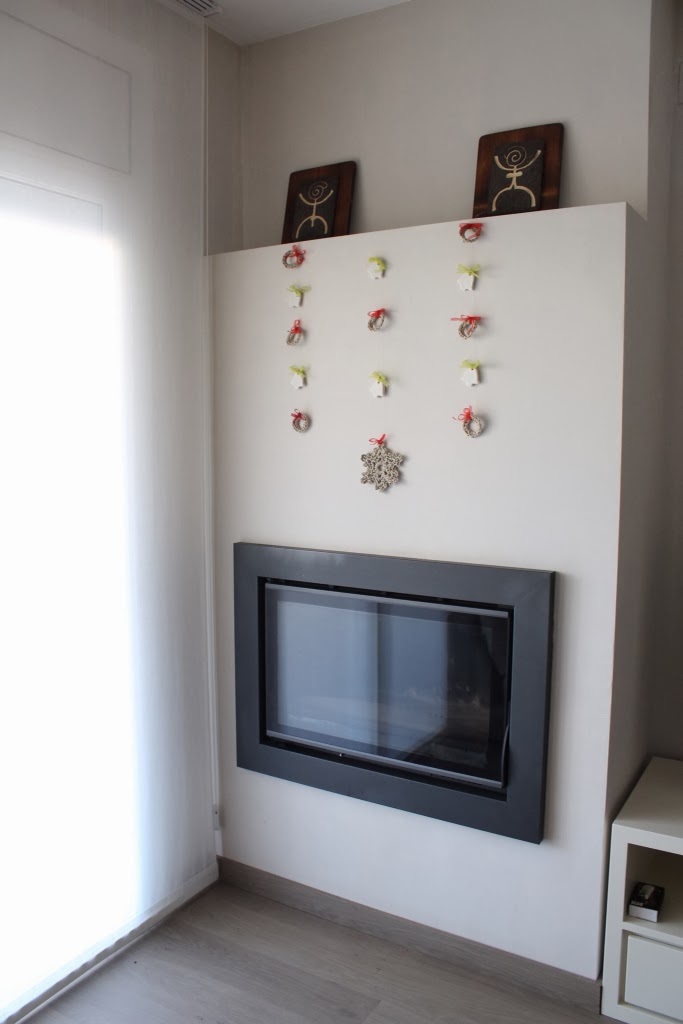
Però és que, com la majoria de vegades, vaig amb retard... De fet, aquest any no vaig penjar els guarniments fins el mateix dia 25!!! I, com veieu, són d'allò més minimalista!

I mira que feia dies que els tenia preparats i que volia publicar aquest post, però la veritat és que la feina d'enllestir l'habitació pel nadó està passant per davant de tot i, a més, ara la panxa ja em comença a limitar una mica...

Bé, per si us animeu a preparar aquest tipus de guarniments per l'any vinent... :P

...el patró del floc de neu el vaig treure d'aquest post d'Attic24, un blog que us recomano moltíssim si sou aficionats/des al ganxet, però confeccionat amb el mateix tipus de cordill que els cistells que us ensenyava fa un temps aquí. Aquest és el patró traduït al català:

Patró del floc de neu:

  • Per començar: feu 5 cadenetes (cd) i uniu per formar un anell.
  • Volta 1: feu 1 cd, un punt baix (pb), 3 cd, *2 pb, 3 cd* (repetiu 4 vegades més la seqüència entre **) i tanqueu amb un punt ras (pr) sobre la cd inicial.
  • Volta 2: feu el següent dins el primer llaç de cadenetes de la volta 1: 1 cd, 1 pb, 3 cd, 2 pb; als següents llaços de cadenetes repetiu això: *2 pb, 3 cd, 2 pb*. Tanqueu amb un pr sobre la cd inicial.
  • Volta 3: feu el següent dins els llaços de cadenetes de la volta anterior: *1 pb, 3 cd, 1 pb, 5 cd, 1 pb, 3 cd, 1 pb, 2 cd*. Tanqueu amb un pr sobre el pb inicial i ja podeu entrar els fils!

Al post original hi trobareu fotos detallades de cada pas.La mini-corona, també de cordill, està feta d'una volta de cadenetes tancada sobre si mateixa i d'una filera de punt baix tot al voltant. Segur que no teniu cap problema per reproduir-la!

I les campanes estan fetes d'una massa de farina, aigua i sal, tallades amb un tallador dels de galetes. A internet trobareu dotzenes de receptes per fer aquest tipus de figures, jo vaig fer servir aquesta. És molt fàcil de fer, ara, us aconsello que deixeu dissoldre bé la sal dins l'aigua calenta, abans d'afegir-hi la farina... per a què no es notin els grans de sal a les figures acabades, com m'ha passat a mi!

Que tingueu un bon acabament d'any!!

-----

Yes, yes... I know... It's a bit late to talk about Christmas ornaments, isn't?

But, as many times, I'm again in delay... Actually, this year I hanged my ornaments the same 25th December!!! And, as you'll see, they're very minimalist!

The funny thing is that I had the ornaments prepared from several weeks ago, but, to say the truth, all the tasks related to prepare the arrival of our first kid are first priority now and, on top of that, the size of my belly is starting to make it all a bit difficult...

Well, just in case you wanna make this kind of ornaments for next year's celebrations... LOL

...I took the pattern for the snowflake from Attic24, a very nice blog for crochet lovers, and made them with the same twine I showed you in these baskets.

The mini-wreath, also in twine, is made from a couple of chains (the number depending on the desired size) joined to make a ring and one row of single crochet around the ring. Pretty easy!

And the bells are made of salt-dough and cut with a cookie cutter. You'll find dozens of recipes on the net for this kind of dough, I used this one. They're very easy to make, but let me recommend you to wait until the salt has dissolved into the warm water, before you add the flour (or, like me, you'll notice the salt in the ornaments).

Have a wonderful end of year!!


diumenge, 22 de desembre del 2013

CAL Manteta Vasarely: el final? / CAL Vasarely Blanket: The end?

Doncs si... ahir era el dia previst per acabar la nostra manteta Vasarely... i, bé, tot i que les darreres setmanes he aconseguit cosir quasi tots els rombes, encara me'n falten un parell i acabar la vora de ganxet per a què la manta quedi polida del tot...

Però de moment estic contenta de com està quedant i espero que els propers dies de festa em deixin el temps lliure suficient per acabar-la del tot!

Si voleu veure com han quedat la resta de mantes, les trobareu aquí!

-----

Yes... Yesterday was the expected day to finish our Vasarely blanket... and, well, although I've sewn almost all the diamonds during the last couple of weeks, there are still a couple missing and I haven't crocheted its edge...

But I'm pretty proud of how it's coming out and I hope I'll find the spare time to finish the blanket during the coming holidays!

You'll find here the results of the rest of the CAL colleagues!


diumenge, 15 de desembre del 2013

Detallet de Nadal 100% casolà / Handmade Christmas gift

Com heu pogut anar veient els/les que seguiu aquest bloc, m'apasiona fer coses amb les meves pròpies mans i compartir els resultats dels meus progressos... i les festes de Nadal són un moment perfecte per ambdues coses! Per això, ja fa un parell d'anys que preparo un petit detallet 100% fet a mà per als meus companys de servei, per celebrar el Nadal i desitjar-los una bona entrada d'any.

L'any passat hi vaig incloure un detalllet fet de ganxet, però aquest cop els he preparat un regalet completament "culinari" format per: un potet d'olives casolanes; un petit pa de carabassa i una galeta decorada amb glasa.

Les olives són de l'olivera del nostre pati, preparades com us vaig explicar en aquest post.

Per al pa de carabassa he fet servir la mateixa recepta que vaig publicar aquí fa unes setmanes, però afegint-hi uns dauets de fruita confitada per donar-li un toc més nadalenc.

I la recepta per a la galeta decorada és la mateixa que per les galetes de Sant Jordi, però decorant-les amb glasa reial i colorant alimentari enlloc de fondant, i inspirant-me en aquests dissenys que vaig veure a Pinterest.

Espero que els hagi agradat tant com a mi preparar-ho!!! :)

-----

As the ones that follow my blog may have guessed, I really love to create things with my own hands and share the results of it... and Christmas time is the perfect moment for both things! That's why, since two years ago, I do prepare a little gift for my unit colleagues... just to say Merry Christmas and wish them Happy New Year.

Last year I included a little crochet gift, but this year I've prepared a 100% "gourmet" gift: a little jar of preserved olives, a small pumpkpin bread and a decorated cookie.

The olives come from the olive tree of my garden, prepared as I told you here.

For the pumpkin bread I used the same recipe I published a couple of weeks ago, but adding some candied fruits.

And the recipe for the cookie is the same as the Saint George's cookies, but decorated with royal icing instead of fondant. The design comes from this pin I saw in Pinterest.

Hope they enjoy the gift as much as I enjoyed its preparation!!! :)


diumenge, 8 de desembre del 2013

CAL Manteta Vasarely #17 / CAL Vasarely Blanket #17

Com veureu a les fotos, la manta ha avançat significativament des del 21 de novembre... :)


Malauradament, encara porto molt endarreriment acumulat i veig difícil tenir-la a punt pel dia esperat... :(

Ara és massa grossa com per a què pugui treballar-hi durant els viatges en tren a la feina, i a casa tinc poques estones lliures... però, vaja, a veure què puc fer els propers 15 dies!!

Aquí podeu seguir l'evolució de la resta de companyes de CAL!

Fins aviat!


-----

As you'll see in my pictures, the blanket has "grown" significantly since November, 21st... :)

Nevertheless, I'm still pretty delayed and I think it will be very difficult to end my work by December, 21st... :(


Right now the blanket is too big to work in it during my commutes, and at home I have few spare time to sew diamonds... Well, let's see what can be done during the next 15 days!!

Here you can follow my CAL colleagues work!

See you soon!

diumenge, 1 de desembre del 2013

Tatin de plàtan / Banana Tatin cake

Ja fa temps que segueixo el blog Las recetitas de Mirasens. Es nota que la seva autora, la Nuria, es fotògrafa professional, perquè les fotos de les seves receptes són fantàstiques i, a més, m'agrada molt la selecció de receptes que presenta al seu blog. L'única pega que li trobo és la poca freqüència amb que publica nous posts... però la veritat és que val la pena passejar-se pel seu arxiu de receptes.

I aquesta que veieu avui ja fa temps que tenia ganes de provar-la. M'encanta la Tatin tradicional de poma i aquesta versió em va atreure de seguida.


Si us agrada el plàtan cuit, no deixeu de provar-la perquè a nosaltres el resultat ens ha encantat! Avui no us transcric la recepta, perquè la trobareu en castellà aquí.

Espero que us animeu a provar-la i que m'expliqueu com us ha quedat!


-----

I've been following Las recetitas de Mirasens' blog for quite a long time. That she's a professional photographer, it becomes obvious looking at the gorgeous pictures of her recipes. And I like very much the choice of recipes she posts. The only con I can find is that she does not post very often... but her archive of recipes really worths a visit.

And I was eager to try the one I show you today. I love the traditional apple Tatin cake and I immediately felt I had to try this version.


If you like the taste of baked bananas, you have to try this one! Here you have the recipe:

Ingredients:
  • 7 tbsp sugar
  • 1/2 tsp lemon juice
  • 1 tbsp unsalted butter
  • 1/2 tsp ground cinnamon
  • 3 bananas
  • puff pastry
Instructions:
  1. In a pan at low heat, let the sugar melt with the lemon juice. Then add the butter to the pan and stir.
  2. Add the cinnamon (you can skip this step if you don't like cinnamon).
  3. Pour the melted sugar on a buttered pan.
  4. Slice the bananas and place them over the caramel.
  5. Place the puff pastry sheet on top of the ingredients, and make some small holes in it with a knife or a fork.
  6. Bake at 180ºC (350 F) for 30 minutes (or until the puff pastry gets golden). Turn the cake upside down immediately.
Thanks for your visit!

dijous, 21 de novembre del 2013

CAL Manteta Vasarely #16 / CAL Vasarely blanket #16

Definitivament... això és una "catacombe"! :P

A aquestes alçades del CAL ja hauria de tenir tots els rombes units i hauria d'estar teixint la vora de la manta... però, com podeu veure, amb prou feines n'he cosit la meitat...


És el problema que tinc... sempre em planifico fer moltes més coses del que és viable fer en el temps lliure que tinc... a vosaltres no us passa??

Bé, la qüestió és que si vull acabar la manteta en el termini previst (el proper 21 de desembre!), més val que m'hi posi seriosament!!

Apa, vaig a veure com ho porten la resta de companyes! Gràcies per la visita!!

-----
Definetely... that's a disaster!! LOL

By now I should have joined all my diamonds and I should have started to crochet the edge of my blanket... but, as you can see, I've scarcely sewn together half of the diamonds...

That's my problem... I always plan to make more projects than I can really fulfill in the freetime I have available... Does it happen to you too??

Well, the point is that, if I want to finish the blanket by the due time (December, 21st), I'd better start working harder on it!!!


Ok, I'll go to have a look at how are the CAL colleagues doing! Thanks for your visit!

diumenge, 17 de novembre del 2013

La meva darrera adquisició / My last acquisition

Hola a tothom!

Aquesta setmana tinc un munt de projectes a mitges... un puf de trapillo pel menjador, el sonall de la granota Gustau que us comentava aquí, la decoració nadalenca... M'he de començar a organitzar ja!!! :P

Mentre no els acabo, us ensenyo la meva darrera adquisició:

Si, si... vaig aprofitar la darrera oferta dels supermercats Aldi per comprar-me una màquina de cosir, per veure si així li trec profit al curs d'iniciació a la costura a màquina que estic fent al Centre Cívic Urgell de Barcelona.

L'estoig que veieu a la foto és el primer resultat del curs... està molt lluny de ser perfecte, però estinc aprenent moltíssim!

Fins aviat!

-----

Hello everybody!

This week I've got a lot of unfinished projects... one xxl crochet pouf for our living room, the Kermit the frog crochet rattle I told you about here, the christmas decor... I'd better start organising my time soon!!! LOL

While I finish them, let me show you my last acquisition:

Yes... A couple of weeks ago I bought a sewing machine! I'm trying to get the best of the sewing for beginners course I'm taking this autumn.

The little purse in the pictures is the first result of the course... It's pretty far away from perfection, but I'm learning a lot!!

See you soon!


diumenge, 10 de novembre del 2013

Galetes d'ametlla / Almond cookies

Ja fa dies que pensava en com utilitzar un paquet de farina d'ametlla que em voltava pel rebost... l'opció de fer-ne panellets estava descartada, perquè en això la meva mare en té l'exclusiva... els fa boníssims!!!


I de sobte vaig ensopegar amb aquesta recepta de galetes d'ametlla del bloc Manzana & Canela! Si us passeu per la seva entrada veureu que la recepta és senzillíssima (no us la copio perquè la trobareu en castellà al post original) i la veritat és que es fan en un moment!

A més, aquest post m'ha descobert el repte culinari que llença cada mes el blog Tía Alia Recetas... i ja tinc ganes de trobar una estoneta per participar-hi!!

La qüestió és que aquestes galetes han quedat perfectes per acompanyar el café de la sobretaula o de mitja tarda... espero que us animeu a provar-les!!


-----

I've been wondering for days now which would be the best way of making use of a ground almonds pack stored in my pantry...


And suddenly, I've stumbled upon this almond cookies recipe from Manzana & Canela's blog! The recipe is extremely easy and takes less than half an hour to make!

Moreover, in that post I've discovered the cooking challenge hosted monthly by Tía Alia Recetas' blog... and I'm eager to find some time to participate!!

Well, those cookies will match perfectly your afternoon tea or coffee. Here you have the recipe, hope you like it!


Ingredients:
  • 125 g ground almonds
  • 125 g sugar
  • 3 egg yolks
  • laminated almonds
Instructions:
  1. Mix sugar and ground almonds.
  2. Whisk the egg yolks, saving about half a yolk, and add them to the previous mix until well combined.
  3. Make balls with bits of the dough, press them between your fingers and place them on a tray.
  4. "Paint" the cookies with the remaining egg yolk and place some laminated almonds on top of each cookie.
  5. Bake them for about 10 minutes at 180ºC (350F).
Thanks for you visit!

divendres, 8 de novembre del 2013

CAL Manteta Vasarely #15 / CAL Vasarely Blanket #15

Finalment he reprès la tasca d'unir rombes...

Com veureu a les fotos (disculpeu per la seva qualitat!), intento recuperar el temps perdut cosint al tren... que avui anava a rebentar, per cert! La gent em mira con si hagués perdut l'enteniment!! XDD


Bé, i la resta de companyes de CAL, com ho porteu??

Fins el dia 21!!

-----

Finally I've resumed the task of sewing diamonds together...

As you'll see in the pictures (please excuse for the low quality!), I'm trying to catch my CAL colleagues by sewing during my commutes...While people looks at me as I've gone mad!! LOL


And what about the rest of my CAL colleagues? How are you doing??

See you again on the 21st!!

diumenge, 3 de novembre del 2013

Olives casolanes / Homemade preserved olives

No sé si us ho he comentat mai, però al pati de casa tenim una olivera jove, peró molt productiva. La veritat és que no sé exactament de quina varietat és... potser manzanilla o hojiblanca... ni idea... Però la qüestió és que ben arreglades són boníssimes!

Per la conserva faig servir la tècnica que m'ha ensenyat la meva mare, que és la que ja feia servir la meva àvia paterna. Aquí la teniu...


Ingredients:
  • Olives verdes
  • Aigua
  • Herbes aromàtiques: farigola, romaní i fenoll (tot i què les podeu variar al vostre gust)
  • Sal
  • Llimones
  • Alls
Preparació:
  1. Comenceu per partir les olives (si trieu olives d'una varietat petita, com arbequines, us podeu estalviar aquest pas) i poseu-les en aigua. Aneu canviant l'aigua de les olives cada dos dies durant un període de 2-3 setmanes (quan en tastar-les hagin perdut l'amargor, ja les teniu a punt).
  2. Quan les olives estiguin a punt per adobar, poseu les herbes aromàtiques en abundant aigua bullint durant 2 o 3 minuts. Apagueu el foc i deixeu refredar (el millor és deixar-ho en repós tota una nit).
  3. L'endemà coleu l'aigua i afegiu 80 g de sal per cada litre, remenant fins que es dissolgui completament.
  4. Ja podeu anar posant les olives en pots de vidre (no és imprescindible esterilitzar-los) així: 2-3 trossets d'all cru i 3 trossets de llimona al cul del pot, olives fins a la meitat, un altre cop els mateixos trossets d'all i llimona, olives fins que falti un dit per arribar al broc del pot i un tall de llimona a sobre.
  5. Ompliu els pots amb la infusió amb sal i tapeu-los. Les olives estaran a punt al cap d'un mes, aproximadament.
Espero que us agradin!

-----

Have I told you that we have a young olive tree in our garden? Actually I'm not sure which kind of olive tree it is exactly, but it yields a pretty big amount of delicious olives, once preserved!
To preserve them I use the technique my mother has teached me, which she learned from my father's mum. That's how...
Ingredients:
  • Green olives
  • Water
  • Herbs: thyme, rosemary and fennel
  • Salt
  • Lemons
  • Garlic
Instructions:
  1. Start by making a lengthwise cut with a knife in every olive (you don't need to do that if you choose a small sized kind of olive) and place them in water. Change the water every two days during the following 2-3 weeks (until they lose their bitter taste).
  2. When you find the olives ready to preserve, place the herbs in plenty boiling water for 2-3 minutes. Let the water cool (better overnight), without removing the herbs from it.
  3. Strain the water and add 80 g of salt for every liter of water, until completely dissolved.
  4. Take some mason jars and fill them this way: put 3 little pieces of lemon and 2-3 half clove of garlic pieces in the bottom of the jar; add olives until the middle of the jar; put the same number of lemon and garlic pieces; add olives to the top and a lemon slice.
  5. Fill the jars with the salted water and close them with their lids. The olives will be ready one month later, approximately.
Hope you like it!

dilluns, 28 d’octubre del 2013

Monstre de les galetes de ganxet / Cookie monster crochet rattle

Com veureu, continuo amb la meva dèria de fer joguines de ganxet per nadons... no sé, no sé... començo a pensar que el fet d'estar embarassada de gairebé 6 mesos hi té alguna cosa a veure... XD

Aquest cop no he pogut resistir-me a reproduir aquest sonall en forma de monstre de les galetes que vaig veure al Pinterest. És un regal per la Queralt, que neixerà a principis, principis del 2014!

Malauradament, no us puc transcriure el patró del sonall, perquè no és gratuït (el vaig adquirir aquí)... tot i què el vaig haver de "redimensionar" del tot, perquè amb les instruccions originals i el ganxet de 3,5mm que generalment faig servir jo, em quedava excessivament petit. Ah! I també hi he afegit algun "extra"... la galeta!

monstre de les galetes de ganxet cookie monster crochet rattle

Bé aquí us deixo unes quantes fotos, i ja em direu què us sembla!!

monstre de les galetes de ganxet cookie monster crochet rattle

Ja tinc en ment fer-ne un altre de semblant, però amb els colors de la granota Gustau per al meu petit!! A veure si us el puc ensenyar aviat...

Gràcies per passar per aquí!

-----

As you'll see, my craving for crocheting gifts for newborns still goes on... I'm not sure... but I've started thinking that the fact I'm almost 6 months pregnant has something to do with it... LOL

This time I've chosen the Cookie monster crochet rattle I saw in Pinterest some weeks ago. This one is a present for Queralt, a baby girl who's due to be born at the very beginning of 2014!

monstre de les galetes de ganxet cookie monster crochet rattle

I'm sorry I can't share the pattern with you, because I bought it here... despite the fact I resized it almost entirely, because with the original instructions and my 3,5mm crochet hook it became far too small, and that I added an "extra"... the cookie!

Well, here you have some pictures of the result. I'm waiting for your comments!!

monstre de les galetes de ganxet cookie monster crochet rattle

I'm planning to make another one, but with Kermit the frog colors for my baby boy!! I hope I'll be able to show it to you soon...

Thank you very much for stopping by!


diumenge, 20 d’octubre del 2013

Pastís de poma "argentí" / Argentinean apple pie

Hola a tothom!!

Després de la pausa "forçada" de la setmana passada per culpa d'una inoportuna indisposició, aquesta setmana torno a la càrrega amb una altra recepta dolça...

Malauradament, la mateixa indisposició ha fet que no pugui avançar gens ni mica en la meva manteta Vasarely, així que aprofito per disculpar-me amb les meves companyes de CAL (demà és dia 21!) i prometo recuperar el temps perdut per a la propera cita.

Bé, per les fotos del pastís de poma segur que pensareu que no és pas el més atractiu que heu vist... i hi estic d'acord! Però us garanteixo que, a més de ser un dels més senzills, també és dels que m'ha donat més bons resultats!


La recepta me la va passar un company de feina (gràcies Joan!) i, acompanyat d'una mica de gelat de vainilla, recorda una mica al pastís Tatin, però amb l'afegit de la canyella, que m'encanta, les nous i les panses.

Espero que us animeu a provar-lo i que us agradi!!

Ingredients:
  • 4 pomes
  • 250 g farina reposteria
  • 250 g sucre
  • 1 cullerada de llevat
  • 1 ou
  • 50 g panses
  • 50 g nous
  • canyella
  • 100 g mantega


Preparació:
  1. Barregeu bé la farina, el llevat, el sucre i l’ou fins que tingui una consistència com de sorra de platja.
  2. Elimineu el cor de les pomes i talleu-les a làmines de dos o tres milímetres de gruix. Cobriu el fons d'un motllo untat amb mantega (o diversos d'individuals) amb una capa de làmines de poma.
  3. Espolseu una mica de canyella i repartiu unes quantes panses i nous trossejades per sobre de la poma. Aneu fent capes repetint el mateix procés.
  4. A sobre de tot, repartiu la barreja amb consistència de sorra que heu preparat abans. Desfeu la mantega al microones i repartiu-la sobre el pastís.
  5. Poseu el pastís al forn uns 40 minuts a 190ºC (els primers 25 minuts només per sota i la resta del temps, per dalt i per sota).
Que aprofiti!!

-----

Hello everybody!!

After a forced break due to a not serious but annoying illness, I'm back again with another sweet recipe...

Unfortunately, the same illness prevented me from working in my Vasarely blanket... so let me apologize to my CAL colleagues (tomorrow is the 21st). I promise to catch up for our next meeting!

Well, looking at the pictures of the apple pie you may think that this one is not the nicest you've ever seen... and I totally agree with you! But I guarantee that it is one of the easiest and tastiest!

I got the recipe from a colleague from the office (thanks Joan!) and, paired with some vanilla ice-cream, it reminds me the Tatin cake, but with the added flavor of cinnamon (which I love!).
Hope you like it!!
Ingredients:
  • 4 apples
  • 250 g flour
  • 250 g sugar
  • 1 tsp baking powder
  • 1 egg
  • 50 g raisins
  • 50 g walnuts
  • ground cinnamon
  • 100 g butter
Instructions:
  1. Mix the flour, baking powder, sugar and the egg, until you get a sand-like texture.
  2. Remove the cores and slice the apples very thinly (to 2-3 mm thick). Cover the bottom of a greased mold or pan with the apple slices.
  3. Add a bit of ground cinnamon, some raisins and walnuts on top of the apples. Repeat the same process until you reach the top of the mold.
  4. Cover with the flour mix. Melt the butter and sprinkle over the cake.
  5. Bake at 375F (190ºC) for about 40 minutes (the first 25 minutes bottom heat only, top and bottom heat for the remaining time).
Enjoy it!!

    dimarts, 8 d’octubre del 2013

    CAL Manteta Vasarely #13 / CAL Vasarely Blanket #13

    Ja torna a ser dia 8 i toca ensenyar els avenços amb la manta Vasarely...


    Com veieu, els darrers dies m'he dedicat a entrar els fils de tots els rombes que em faltaven... i ara toca tornar a agafar el fil i l'agulla i començar a veure crèixer la manta!

    Gràcies per la visita!

    -----

    It's the 8th, and it's time again to show my progress with the Vasarely blanket...


    As you can see, I've spend those days weaving in the ends of all the diamonds left... and now it's time to start joining them and to see how the blanket grows!


    Thanks for your visit!

    diumenge, 6 d’octubre del 2013

    Pa de carabassa / Pumpkin bread

    L'any passat uns amics ens van regalar mitja carabassa enorme, que vaig aprofitar per fer crema i per provar una recepta de pa de carabassa que em va cridar l'atenció al Pinterest.
    Ens va agradar tant que la vaig acabar repetint uns quants cops més durant la tardor, i aquest any estava esperant l'oportunitat de tornar-hi. Fins que aquesta setmana he vist aquest post a IFeelCook... la seva recepta m'ha semblat més senzilla que la que vaig provar l'any passat i l'aspecte és impressionant, així que m'hi he tirat de cap!

    I, efectivament, es prepara en un moment i, pel que fa al gust, també ens ha agradat més que el de l'any passat. Queda molt esponjós!!
    Com que la recepta és en castellà i l'he seguit al peu de la lletra (sense que serveixi de precedent! :P), aquest cop us adreço al post original, enlloc de reproduir-la. La visita al blog d'IFeelCook val la pena!!

    Gràcies per la visita!
    -----
    Last year a friend gave us a half of a huge pumpkin, with which I made several soups and a pumpkin bread that caught my eye in Pinterest.
    We enjoyed the bread so much, that I repeated the same recipe several times during last autumn. And I've been waiting for a chance to go for it again this year... Until I've seen that post in the blog IFeelCook... this recipe seems easier to follow than the one I tested last year, and it's bread looks gorgeous! So I've tried it!
    And, effectively, it's really easy to prepare and we definitely prefer it's taste and texture over the one I tested last year!
    Here you have the recipe translated to English, but don't miss the chance to visit IFeelCook's blog, it really worths it!
    Ingredients:
    • 200 g (7 ounces) pumpkin purée
    • 2 eggs
    • 65 g (2,3 ounces) water
    • 90 g (3,2 ounces) vegetable oil (I used olive oil)
    • 200 g (7 ounces) sugar
    • 225 g (8 ounces) wheat flour
    • 5 g (1 tbsp aprox.) baking soda
    • 1 tsp salt
    • 1/2 tbsp mixed spices
    Instructions:
    1. Whisk together pumpkin puree, eggs, water, oil and sugar until well incorporated.
    2. Sift together the flour, baking soda, salt and mixed spices.
    3. Add the dry ingredients, little by little, to the wet ones while mixing gently.
    4. Bake in the oven at 170ºC (340 F) for about 45 minutes (or until a toothpick comes out clean).
    Thanks for your visit!