

dijous, 25 de desembre del 2014
Bones festes!!!! / Merry Christmas!!!!
Us desitjo molt bones festes a tots i totes!! I whish you a Merry, Merry Christmas!!

dissabte, 20 de desembre del 2014
Cors de carxofa amb escopinyes / Artichoke hearts with cockles
Fa uns quants diumenges vam anar a dinar al restaurant Soldevila de Calders. Si us agrada l'arròs, no us el podeu perdre... la meva parella n'és un fanàtic i hi anem de tant en tant.
Aquest cop, però, a mi em van encantar els entrants. Sobretot els escamarlanets amb fredolics i també les carxofes amb escopinyes que he versionat per aquesta entrada... Qui diu que la verdura no pot estar bona???? Perquè aquestes carxofetes bones no, són boníssimes!!!

A més, si feu com jo, les tindreu en un moment i quedareu com uns/es senyors/es qualsevol d'aquest dies de festes... Per anar ràpid, enlloc de fer servir carxofes fresques, em vaig estalviar la feina de netejar-les i coure-les comprant cors de carxofa cuits i envasats al buit! Si no en trobeu, els cors de carxofa congelats també són una bona opció.
Ah! I recordeu deixar en remull amb aigua freda i sal les escopinyes una bona estona (30'), per tal què deixin anar tota la sorra possible, abans de cuinar-les.
Ingredients (per 2 si feu un primer plat, 4 si ho feu com entrant o aperitiu):
- 200 g de cors de carxofa cuits
- 250 g d'escopinyes fresques
- 100 g de cigronet cuit (opcionals, no hi eren a la recepta original però ens hi han agradat molt!!)
- 1 cullerada sopera de tomàquet fregit
- 1/2 ceba petita
- 1 all
- Oli, sal
Preparació:
- En una paella fonda, daureu lleugerament l'all picat ben petit. Afegiu-hi la ceba també tallada petita.
- Mentrestant, en una paella a banda, poseu les escopinyes amb un rajolí d'aigua per a què s'obrin (així la sorra que hi hagi pogut quedar no anirà a parar al plat). Tanqueu el foc de seguida que s'obrin per tal què no es passin de cocció.
- Un cop la ceba comenci a estar transparent, afegiu-hi els cors de carxofa i els cigrons cuits. Doneu un parell de voltes i afegiu la cullerada de tomàquet fregit. Remeneu amb delicadesa fins que quedi ben integrat.
- Afegiu les escopinyes i el caldo de la seva cocció (passat pel colador) a les carxofes, remeneu-ho un parell de cops i ja és a punt de servir!
Gràcies per la visita!!

-----
From time to time we love to have lunch in a restaurant named Soldevila. It's placed in a small town almost an hour ride from home, but it really worth the travel. Especially for their fantastic rice dishes.
But what I enjoyed the best during our last visit were the starters... They know how to combine veggies and shellfish!!!
Here you have my version of the delicious artichokes we ate. Using frozen or preserved heart artichokes, like me, you'll have the dish ready in no more than 15 minutes!
Or you can prepare it in advance and become the queen/king of the upcoming holiday's meals!!

Ingredients (2 people):
- 200 g preserved artichoke hearts
- 250 g cockles (or clams)
- 100 g chickpeas (already cooked)
- 1 tbsp tomato sauce
- Half little onion
- 1 garlic clove
- Olive oil, salt
Preparation:
- Add about 2 tablespoons olive oil to a sauce pan and lightly cook the garlic clove, minced. Add the onion, minced too.
- Meanwhile, add fresh cockles and a tablespoon water to another sauce pan. Turn off the heat as soon as cockles start to open.
- Add artichoke hearts and chickpeas to the onion. Stir and add a tablespoon tomato sauce. Let cook for two minutes.
- Add cockles and its cooking juice (strained, to avoid sand going to your dish) to the artichokes, stir a couple of times and it's ready to be served!
Thanks for your visit!!
dissabte, 22 de novembre del 2014
Arròs de muntanya amb calamars / Sausage and squids rice
No m'havia adonat que feia tant temps que no publicava cap recepta...
Per fer-me perdonar, avui us deixo l'adaptació que he fet d'una recepta del Restaurant Les Cols, d'Olot. Quan veig veure aquest vídeo al programa Cuines de TV3, vaig quedar garrativada en veure que posaven a l'arròs calamars de llauna!
No vaig poder evitar provar-la... i ens va encantar! Fins al punt que no parem de repetir-la amb més o menys fidelitat a la recepta original. Aquest cap de setmana, per exemple, hi he substituït les carxofes per un grapat de camagrocs...

Aquí en teniu la recepta... Animeu-vos a provar-la, no és pot fer un arròs més senzill i més gustós!
Ingredients (4 persones):
- 400 g d'arròs
- 200 g de botifarra
- 1 llauna de calamarsons farcits
- 1 llauna de calamars en la seva tinta
- 1 ceba
- 2 pebrots verds (tipus italià)
- 150 g de camagrocs (prèviament saltats en una mica d'oli)
- Aigua, sal i oli d'oliva verge
Preparació:
- Sofregiu la botifarra trossejada en un bon raig d'oli.
- Quan estigui rossa, afegiu la ceba tallada petitona. Un cop comenci a ser transparent, afegiu el pebrot tallat petit. Deixeu que se sofregeixi tot plegat.
- Afegiu els camagrocs i les dues llaunes de calamars (trossejats), i doneu-los un parell de voltes.
- Afegiu l'arròs, sofregiu-lo una mica i afegiu l'aigua bullint. Corregiu el punt de sal i deixeu coure uns 18 minuts.
Bon profit!
PD: Gràcies per l'atrezzo Ale!! :)

-----
Wow... It's been quite a long time since I last posted a recipe...
To say sorry, let me show you the adaptation I've made of a recipe from the restaurant Les Cols, here in Catalonia. When I saw this rice recipe in a local cooking TV show, my jaw dropped open: canned squids???
I couldn't help but to try it... and we loved it! To the extent that we keep cooking it once and again with minor changes. This weekend, for example, I replaced the artichokes in the original recipe for a bunch of mushrooms...

Here's the recipe... Let me encourage you to try it, it couldn't be easier to make such a flavorful rice!
Ingredients (4 people):
- 400 g rice
- 200 g sausage
- 1 can of stuffed squid
- 1 can of squid in its own ink
- 1 onion
- 2 small green peppers
- 150 g mushrooms (previously sauteed in olive oil)
- Water, salt and olive oil
Preparation:
- Fry the sliced sausage with olive oil in a big pan.
- Cut the onion thinly, and add it to the pan. Wait for 5 minutes and add the pepper (thinly cut too). Let fry everything.
- Add the mushrooms and both cans of squid (sliced), and stir for a minute or two.
- Add the rice, let it fry a litlle bit and add boiling water. Season with salt and cook for about 18 minutes.
Bon appetit!
diumenge, 16 de novembre del 2014
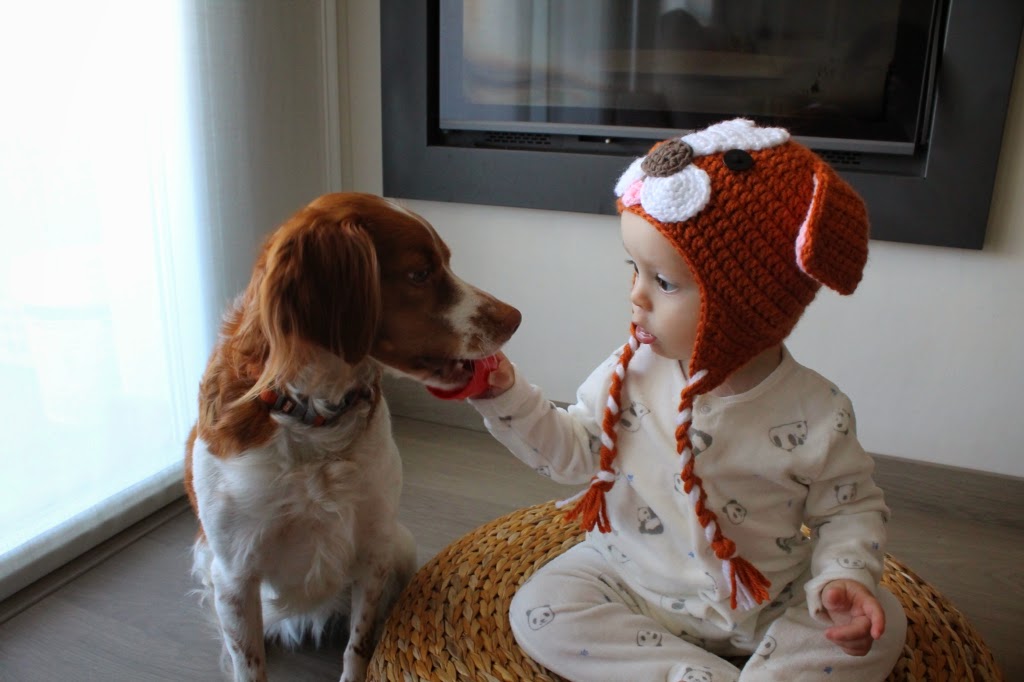
Barret-gos de ganxet / Crochet dog hat pattern
Definitivament ha arribat el fred!! Ja pensava que no us podria ensenyar mai dos dels projectes en que estic treballant... i és que la calor de les darreres setmanes no convidava gens a pensar en mantes, ni en gorros de llana, ni en res semblant!
Però ara si que si, ja us puc ensenyar el barret que li he fet al Guim per a què vagi d'allò més conjuntat amb la nostra gosseta bretona, la Llum!

Per fer-lo m'he basat en un dels patrons de la Sarah, de Repeat crafter me, una autèntica màquina a l'hora de crear barrets i que, a més, comparteix tots els seus patrons gratuïtament... i en té centenars!! En aquest cas he adaptat el seu barret de gos dàlmata per tal què s'assemblés tot el possible a la nostra gosseta, ja em direu si ho he aconseguit!
Al final d'aquest post us deixo el patró adaptat per a la talla de 12 mesos (la Sarah assegura que es pot fer servir ben bé fins als 16 mesos).
Espero que us animeu a fer-lo i m'ensenyeu els resultats!
Gràcies per la visita!
-----
Cold is finally here!! I was starting to think I was never going to be able to show you two of my on-going projects... the unexpected "hot" weather of last October was not the best scenario to talk about winter hats or blankets!
But the time has come to reveal the hat I've made "clonating" our lovely dog.

This hat is based upon Sarah's dalmatian dog hat. She's a master when it comes to creating crochet hats and, on top of that, she shares all their patterns for free!!
At the end of the post you'll find the few adaptations I've made to the original pattern (size 12 months).
Thanks for your visit!

*******
Patró en català (english pattern below):
Materials:
- Llana (millor si és acrílica, per a què no piqui) en color marró clar, marró fosc, blanc i rosa
- Agulla de ganxet de 4,5 mm
- Agulla gruixuda per unir les peces i entrar fils
- Dos botons (per als ulls)
Abreviatures:
- cd - cadeneta
- pb - punt baix
- mpa - mig punt alt
- pa - punt alt
- augm - augment
- dism - disminució
Patró:
Barret:
El barret es treballa en marró clar i tancant cada volta, no en espiral.
- Volta 1: amb la llana marró, feu un anell màgic amb 11 pa, tanqueu la volta unint al primer pa, 2 cd
- Volta 2: 1 augm en cada punt de la volta, tanqueu, 2 cd (22)
- Volta 3: *1 augm, 1 pa*, repetiu * en tota la volta, tanqueu, 2 cd (33)
- Volta 4: *1 augm, 2 pa*, repetiu * en tota la volta, tanqueu, 2 cd (44)
- Volta 5: *1 augm, 10 pa*, repetiu * en tota la volta, tanqueu, 2 cd (48)
- Volta 6: *1 augm, 11 pa*, repetiu * en tota la volta, tanqueu, 2 cd (52)
- Volta 7: *1 augm, 12 pa*, repetiu * en tota la volta, tanqueu, 2 cd (56)
- Voltes 8-13: 1 pa en cada punt de la volta, tanqueu, 2 cd (56). A la volta 13 no feu les dues darreres cd, continueu amb les orelleres així:
Orellera 1:
- Feu 1 cd, 10 pb, 1 cd, gireu
- 1 dism, 6 pb, 1 dism, 1 cd, gireu
- 1 pb en cada punt, 1 cd, gireu (8)
- 1 dism, 4 pb, 1 dism, 1 cd, gireu
- 1 pb en cada punt, 1 cd, gireu (6)
- 1 dism, 2 pb, 1 dism, 1 cd, gireu
- 1 pb en cada punt, 1 cd, gireu (4)
- 2 dism, 1 cd, gireu
- 1 dism, tanqueu i entreu fils
Orellera 2:
En aquest post de la Sarah trobareu una imatge amb indicacions d'on començar la segona orellera.
- Feu 1 cd, 10 pb, 1 cd, gireu
- 1 dism, 6 pb, 1 dism, 1 cd, gireu
- 1 pb en cada punt, 1 cd, gireu (8)
- 1 dism, 4 pb, 1 dism, 1 cd, gireu
- 1 pb en cada punt, 1 cd, gireu (6)
- 1 dism, 2 pb, 1 dism, 1 cd, gireu
- 1 pb en cada punt, 1 cd, gireu (4)
- 2 dism, 1 cd, gireu
- 1 dism, continueu fent pb per tota la vora del barret i les orelleres. Tanqueu i entreu fils.
Orelles:
Feu-ne 4, dues en marró clar i dues en rosa.
- Volta 1: Feu 6 cd, 1 mpa a la segona cd i 1 mpa a cada cd restant (5)
- Voltes 2-3: 1 mpa en cada punt (5)
- Volta 4: 1 augm, 3 mpa, 1 augm, 1 cd, gireu (7)
- Voltes 5-6: 1 mpa en cada punt (7)
- Volta 7: 1 augm, 3 mpa, 1 augm, 1 cd, gireu (9)
- Voltes 8-9: 1 mpa en cada punt (9)
Al final de la volta 9 continueu fent pb per tota la vora de l'orella. Cosiu entre si una orella marró i una rosa abans d'unir-les al barret.
Nas:
- Volta 1: amb llana marró fosc feu 5 cd, 1 pb a la segona cd i 1 pb a cada cd restant, 1 cd, gireu (4)
- Volta 2: 1 pb en cada punt, 1 cd, gireu (4)
- Volta 3: 2 dism, continueu fent pb per tota la vora del nas (feu 2 pb a cada cantonada). Tanqueu i deixeu el fill llarg per unir el nas al barret.
Llengua:
- Volta 1: amb llana rosa feu 4 cd, 1 mpa + 1 pa a la segona cd, 1 pa, 1 pa + 1 pb a la darrera cd. Feu pb seguint l'altre costat de les cadenetes. Tanqueu i deixeu el fil llarg per unir la llengua al barret.
Galtes (feu-ne 2):
- Volta 1: amb llana blanca feu un anell màgic amb 5 pb, continueu treballant en espiral.
- Volta 2: 1 augm en cada punt (10)
- Volta 3: *1 augm, 1 pb*, repetiu * en tota la volta (15)
- Volta 4: *1 augm, 2 pb*, repetiu * en tota la volta (20). Tanqueu i deixeu el fil llarg.
Taca del front:
- Volta 1: amb llana blanca feu 2 cd, feu 2 pb a la segona cadeneta, 1 cd, gireu (2)
- Volta 2: 1 pb, 1 augm, 1 cd, gireu (3)
- Volta 3: 2 pb, 1 augm, 1 cd, gireu (4)
- Volta 4: 4 pb, 1 cd, gireu (4)
- Volta 5: 3 pb, 1 augm, 1 cd, gireu (5)
- Volta 6: 5 pb, 1 cd, gireu (6)
- Volta 7: 4 pb, 1 augm, 1 cd, gireu (6)
- Volta 8: 6 pb, 1 cd, gireu (6)
- Volta 9: 5 pb, 1 augm, 1 cd, gireu (7) *
- Volta 10: 4 pb, 1 cd, gireu (4)
- Volta 11: 2 dism, 1 cd, gireu (2)
- Volta 12: 1 dism. Tanqueu i entreu el fil
Torneu a unir el fil al 5è punt de la 9a volta * i feu:
- Volta 1: 3 pb, 1 cd, gireu (3)
- Volta 2: 1 pb, 1 dism, 1 cd, gireu (2)
- Volta 3: 1 dism. Tanqueu i entreu els fils.
Cosiu primer la llengua al barret i, a sobre, cosiu les dues galtes lleugerament superposades a la llengua. Cosiu la taca del front. Després cosiu el nas superposat a les galtes. Cosiu els ulls.
Per fer les trenes per lligar el barret, talleu 6 fils de llana marró clar i 3 de llana blanca. Passeu els 9 fils per la punta de l'orellera, treneu-los i feu un nus a la punta. Repetiu el procés per l'altra orellera.
**********
Follow Sarah's pattern for hat and earflaps, ears, cheeks, tongue, nose and braided tails. Instead of the black spots of the dalmatian hat, crochet the following white front spot:
- Row 1: chain 2, 2 sc in second chain from hook, ch 1, turn (2)
- Row 2: 1 sc, 1 sc increase, ch 1, turn (3)
- Row 3: 2 sc, 1 sc incr, ch 1, turn (4)
- Row 4: 4 sc, ch 1, turn (4)
- Row 5: 3 sc, 1 sc incr, ch 1, turn (5)
- Row 6: 5 sc, ch 1, turn (6)
- Row 7: 4 sc, 1 sc incr, ch 1, turn (6)
- Row 8: 6 sc, ch 1, turn (6)
- Row 9: 5 sc, 1 sc incr, ch 1, turn (7) *
- Row 10: 4 sc, ch 1, turn (4)
- Row 11: 2 sc decrease, ch 1, turn (2)
- Row 12: 1 sc decr. Fasten off and weave in ends.
Join again at the 5th stitch of row number 9 * and:
- Row 1: 3 sc, ch 1, turn (3)
- Row 2: 1 sc, 1 sc decr, ch 1, turn (2)
- Row 3: 1 sc decr. Fasten off and weave in ends.
diumenge, 26 d’octubre del 2014
Cactus de ganxet núm. 2 / Crocheted cactus nº2
I aquí teniu el segon cactus de la sèrie!!

He aprofitat els viatges en tren a la feina per fer-lo i, no us ho creureu, però la resta de viatgers m'han estat observant amb unes cares raríiiiissimes... sobretot mentre cosia el cactus més gran a la base... no entenc perquè... :-P
Aquí us deixo el patró i me’n vaig a preparar l'entrada per ensenyar-vos el cargol de trapillo que he preparat per a la decoració de tardor de l'escola bressol del meu fill.
Gràcies per la visita!!
Materials:
- Fil acrílic o de cotó en color verd, marró i taronja
- Ganxet de 3,5 mm
- Llana o guata per farcir el cactus
- Agulla gruixuda per rematar

Abreviatures:
- cd - cadeneta
- pr - punt ras
- pb - punt baix
- augm - augment: feu dos punts baixos al mateix punt
- dism – disminució: tanqueu dos punts baixos junts
Patró:
Pel cactus gran:
- Volta 1: Feu un anell màgic amb 6 pb.
- Volta 2: Feu un augm en cada punt (12)
- Volta 3: *1 augm, 1 pb*, repetiu * en tota la volta (18)
- Volta 4: *1 augm, 8 pb*, repetiu * en tota la volta (20)
- Voltes 5-30: Feu 1 pb en cada punt de la volta (20). Tanqueu amb un pr i deixeu el fil llarg per poder unir la peça a la base.
Pel cactus mitjà:
- Volta 1: Feu un anell màgic amb 6 pb.
- Volta 2: Feu un augm en cada punt (12)
- Volta 3: *1 augm, 2 pb*, repetiu * en tota la volta (16)
- Voltes 4-20: Feu 1 pb en cada punt de la volta (16). Tanqueu amb un pr i deixeu el fil llarg per poder unir la peça a la base.
Pel cactus petit:
- Volta 1: Feu un anell màgic amb 5 pb.
- Volta 2: Feu un augm en cada punt (10)
- Volta 3: *1 augm, 1 pb*, repetiu * en tota la volta (15)
- Voltes 4-10: Feu 1 pb en cada punt de la volta (15). Tanqueu amb un pr i deixeu el fil llarg per poder unir la peça a la base.

Per la base (terra):
- Volta 1: Amb el fil marró, feu un anell màgic amb 6 pb.
- Volta 2: Feu un augm en cada punt (12)
- Volta 3: *1 augm, 1 pb*, repetiu * en tota la volta (18)
- Volta 4: *1 augm, 2 pb*, repetiu * en tota la volta (24)
- Volta 5: *1 augm, 3 pb*, repetiu * en tota la volta (30)
- Volta 6: *1 augm, 4 pb*, repetiu * en tota la volta (36)
- Volta 7: *1 augm, 5 pb*, repetiu * en tota la volta (42)
- Volta 8: *1 augm, 6 pb*, repetiu * en tota la volta (48)
- Volta 9: *1 augm, 7 pb*, repetiu * en tota la volta (54)
- Voltes 10-13: Feu 1 pb en cada punt de la volta (54). Tanqueu, farciu els tres cactus amb guata i cosiu-los a la base.
- Amb el fil taronja, feu un anell màgic amb els següents punts: *3 cd, 1 pr*, repetiu * 5 cops. Tanqueu i uniu les flors als cactus.
-----
And here you have the second cactus of my series!!

I’ve crocheted it during my train commutes and, you won’t believe it… but the other passengers stared at me with reeeeally weird faces while I was attaching the bigger cactus to the base… I can’t understand why… LOL
Here you have the pattern! Now I’ll run to write the post to show you the snail I’ve crocheted as an autumn decoration for my baby boy’s school.
Thanks for your visit!!
Materials:
- Crochet yarn in green, brown and orange colors
- 3,5 mm size crochet hook
- Filling
- Tapestry needle to weave in ends
Abbreviations:
- ch - chain
- sl - slip stitch
- sc - single crochet
- incr – single crochet increase
- decr – single crochet decrease

Pattern:
Big sized cactus:
- Round 1: with green yarn, make a magic ring with 6 sc.
- Round 2: crochet an incr in all the stitches of the round (12)
- Round 3: *1 incr, 1 sc*, repeat * around (18)
- Round 4: *1 incr, 8 sc*, repeat * around (20)
- Rounds 5-30: crochet 1 sc in all the stitches of the round (20). Join with a sl and leave a long tail to sew the cactus to the ground base.
Medium sized cactus:
- Round 1: with green yarn, make a magic ring with 6 sc.
- Round 2: crochet an incr in all the stitches of the round (12)
- Round 3: *1 incr, 2 sc*, repeat * around (16)
- Rounds 4-20: crochet 1 sc in all the stitches of the round (16). Join with a sl and leave a long tail to sew the cactus to the ground base.
Small sized cactus:
- Round 1: with green yarn, make a magic ring with 5 sc.
- Round 2: crochet an incr in all the stitches of the round (10)
- Round 3: *1 incr, 1 sc*, repeat * around (15)
- Rounds 4-10: crochet 1 sc in all the stitches of the round (15). Join with a sl and leave a long tail to sew the cactus to the ground base.
Ground base:
- Round 1: with brown yarn, make a magic ring with 6 sc.
- Round 2: crochet an incr in all the stitches of the round (12)
- Round 3: *1 incr, 1 sc*, repeat * around (18)
- Round 4: *1 incr, 2 sc*, repeat * around (24)
- Round 5: *1 incr, 3 sc*, repeat * around (30)
- Round 6: *1 incr, 4 sc*, repeat * around (36)
- Round 7: *1 incr, 5 sc*, repeat * around (42)
- Round 8: *1 incr, 6 sc*, repeat * around (48)
- Round 9: *1 incr, 7 sc*, repeat * around (54)
- Rounds 10-13: crochet 1 sc in all the stitches of the round (54). Join with a sl, stuff the three cacti and attach to the base.
Flowers (make 4):
- With orange yarn, make a magic ring with the following stitches: *3 cd, 1 sl st*, repeat * 5 times. Join and attach to the cacti.
dissabte, 11 d’octubre del 2014
Dinosaure de patchwork / Patchwork dinosaur
A mi el que definitivament em va és el ganxet...
Però de tant en tant, xafardejant algun blog o passant l’estona a Pinterest trobo alguna altra manualitat que em crida sense remei: Fes-me!!!!!

I és igual que s’hagi de pintar, cosir, fer punt o el que sigui... encara que no en tingui ni idea, m’hi acabo tirant de cap!
Aquest dinosaure és un d’aquests casos... el vaig veure a Pinterest, el vaig repinejar de seguida i vaig aprofitar la meva darrera visita a la fira Creativa de l’Hospitalet de Llobregat per comprar la roba i les cintes per fer-lo. Això de fer-lo s’ha endarrerit més del que voldria, però finalment la setmana passada m’hi vaig posar i aquí en teniu el resultat!

No ens enganyem, està clar que he de millorar moooolt amb la màquina de cosir, però sembla que això al Guim no li molesta... Li encanten les cintes!!
I ja tinc preparada la propera "incursió cap al desconegut"! Mireu quin llibre més xulo m’ha regalat la meva amiga Alegria: està ple de monstres fets de punt, m’encanta!!!

Gràcies per la visita!!!
-----
Definitely… my thing is crocheting!
But, from time to time, I find a blog post or a pin that I can’t ignore… even though it implies painting, sewing, knitting or whatever!
That’s the case of this dinosaur… I found it on Pinterest and immediately bought the fabric and ribbons to make it. And, finally, last week I found the time to sew it.

Truth to be told, I’ve got a looooot to learn when it comes to using a sewing machine. But, nevertheless, my baby boy is enjoying a lot his new toy!!

Oh! And let me show you my next "project to the unknown": I’ll be knitting one of the monsters from the book a very good friend has just given me. I love it!!!

Thanks for your visit!!!
dimecres, 1 d’octubre del 2014
Cactus de ganxet / Crocheted cactus
Això de tornar al ritme de publicar una entrada per setmana serà més difícil del que em pensava...
A part del fet que tinc molt menys temps que abans que en Guim naixés, resulta que últimament sóc víctima d'una mena d'indecisió malaltissa a l'hora de decidir el següent projecte a fer...
No és que no sàpiga què fer, no. Al contrari, tinc tantes coses pendents que vaig picant d'aquí i d'allà sense acabar-ne cap! Ainsss...
Bé, mentre no em passa la tonteria, us avanço un dels dos cactus que fa la tira que volia fer per omplir un mini-test doble que vaig comprar per posar a la cuina... No sé si us he explicat mai que les plantes decoratives no són gens el meu fort. Mato fins i tot els cactus! Espero que aquest sigui l'excepció, je je je!

Apa, a veure si ben aviat us ensenyo la seva parella!
I gràcies per la visita!
Materials:
- Fil acrílic o de cotó en color verd, marró i rosa/vermell
- Ganxet de 3,5 mm
- Llana o guata per farcir el cactus
- Agulla gruixuda per rematar
Abreviatures:
- cd - cadeneta
- pr - punt ras
- pb - punt baix
- augm - augment: feu dos punts baixos al mateix punt
- dism – disminució: tanqueu dos punts baixos junts

Patró:
Pel cos del cactus:
- Volta 1: Feu un anell màgic amb 6 pb.
- Volta 2: Feu un augm en cada punt (12)
- Volta 3: *1 augm, 1 pb*, repetiu * en tota la volta (18)
- Volta 4: *1 augm, 2 pb*, repetiu * en tota la volta (24)
- Volta 5: *1 augm, 3 pb*, repetiu * en tota la volta (30)
- Voltes 6-12: Feu 1 pb en cada punt de la volta (30)
- Volta 13: *1 dism, 3 pb*, repetiu * en tota la volta (24)
- Voltes 14-21: Feu 1 pb en cada punt (24)
- Volta 22: *1 dism, 4 pb*, repetiu * en tota la volta (20)
- Voltes 23-30: Feu 1 pb en cada punt (20). Tanqueu i deixeu el fil llarg per poder unir la peça a la base. Farciu amb guata.
- Volta 1: Feu un anell màgic amb 5 pb.
- Volta 2: Feu 1 augm en cada punt (10)
- Volta 3: *1 augm, 1 pb*, repetiu * en tota la volta (15)
- Voltes 4-6: Feu 1 pb en cada punt (15)
- Volta 7: *1 dism, 3 pb*, reptiu en tota la volta (12)
- Volta 8: Feu 1 pb en cada punt (12)
- Voltes 9-13: Feu 6 pr, 6 pb (12)
- Volta 14: 1 dism, 4pb, 1 dism, 4 pb (10)
- Volta 15: Feu 1 pb en cada punt (10). Tanqueu i deixeu un fil una mica llarg. Amb aquest fil, cosiu el braç al cos del cactus, un cop farcit amb la guata.
Per la flor:
- Per la flor he utilitzat el patró que trobareu en aquesta entrada del blog Tejiendo Perú (inclou vídeo!).
Per la base (terra):
- Volta 1: Amb el fil marró, feu un anell màgic amb 6 pb.
- Volta 2: Feu un augm en cada punt (12)
- Volta 3: *1 augm, 1 pb*, repetiu * en tota la volta (18)
- Volta 4: *1 augm, 2 pb*, repetiu en tota la volta (24)
- Volta 5: *1 augm, 3 pb*, repetiu en tota la volta (30)
- Volta 6: *1 augm, 4 pb*, repetiu en tota la volta (36)
- Volta 7: *1 augm, 5 pb*, repetiu en tota la volta (42)
- Volta 8: *1 augm, 6 pb*, repetiu en tota la volta (48)
- Volta 9: *1 augm, 7 pb*, repetiu en tota la volta (54)
- Voltes 10-13: Feu 1 pb en cada punt (54)
-----
Going back to the monthly posting rate will be harder than I thought...
Since my son has born, the spare time I spent crocheting has shrunk... But, worse than that, I'm victim of kind of a paralyzing doubt when it comes to choosing my next project crochet...
I have so many pending projects that I seem totally unable to select only one and to crochet it all before going to the next one! Ouch...
Well... while I wait for a cure for that illness LOL, here you have the pattern of the cactus I've crocheted for my kitchen... Have I told you that I'm so bad with decorative plants that I even kill real cactus??

I hope I'll be able to show you his matching mate soon!
Thanks for your visit!
Materials:
- Crochet yarn in green, brown and pink/red colors
- 3,5 mm size crochet hook
- Filling
- Tapestry needle to weave in ends
Abbreviations:
- ch - chain
- sl - slip stitch
- sc - single crochet
- incr – single crochet increase
- decr – single crochet decrease

Pattern:
Cactus "body":
- Round 1: with green yarn, make a magic ring with 6 sc.
- Round 2: crochet an incr in all the stitches of the round (12)
- Round 3: *1 incr, 1 sc*, repeat * around (18)
- Round 4: *1 incr, 2 sc*, repeat * around (24)
- Round 5: *1 incr, 3 sc*, repeat * around (30)
- Rounds 6-12: crochet 1 sc in all the stitches of the round (30)
- Round 13: *1 decr, 3 sc*, repeat * around (24)
- Rounds 14-21: crochet 1 sc in all the stitches of the round (24)
- Round 22: *1 decr, 4 sc*, repeat * around (20)
- Rounds 23-30: Crochet 1 sc in all the stitches of the round (20). Join and leave a long tail to sew the body to the ground base. Stuff the body.
Cactus "arm":
- Round 1: with green yarn, make a magic ring with 5 sc.
- Round 2: crochet an incr in all the stitches of the round (10)
- Round 3: *1 incr, 1 sc*, repeat * around (15)
- Rounds 4-6: crochet 1 sc in all the stitches of the round (15)
- Round 7: *1 decr, 3 sc*, repeat * around (12)
- Round 8: crochet 1 sc in all the stitches of the round (12)
- Rounds 9-13: 6 sl, 6 sc (12)
- Round 14: 1 decr, 4 sc, 1 decr, 4 sc (10)
- Round 15: crochet 1 sc in all the stitches of the round (10). Stuff the arm. Join and leave a long tail to sew the arm to the body.
Flower:
- I've used the pattern you'll find in this post from Tejiendo Perú (video included!).
Ground base:
- Round 1: with brown yarn, make a magic ring with 6 sc.
- Round 2: crochet an incr in all the stitches of the round (12)
- Round 3: *1 incr, 1 sc*, repeat * around (18)
- Round 4: *1 incr, 2 sc*, repeat * around (24)
- Round 5: *1 incr, 3 sc*, repeat * around (30)
- Round 6: *1 incr, 4 sc*, repeat * around (36)
- Round 7: *1 incr, 5 sc*, repeat * around (42)
- Round 8: *1 incr, 6 sc*, repeat * around (48)
- Round 9: *1 incr, 7 sc*, repeat * around (54)
- Rounds 10-13: crochet 1 sc in all the stitches of the round (54)
dissabte, 30 d’agost del 2014
Gelats de iogurt i nabius / Blueberry yogurt popsicles
Ainsss... què ràpid ha passat l'estiu... sembla mentida que dilluns ja em toqui tornar a la feina!
Bé, intentarem alegrar el darrer cap de setmana de "llibertat" amb uns gelats... Per fer-los he aprofitat els nabius que vam recollir durant les vacances, però en podeu trobar fàcilment en molts supermercats (al Lidl n'he trobat tan de frescs com de congelats!).

A la xarxa trobareu dotzenes de receptes per fer aquests gelats, amb poques variacions. Jo els he preparat amb iogurts naturals convencionals, i han quedat boníssims!! Tot i què els meus motlles no són tan "fashion" com els que veureu a les fotos que volten per la xarxa, jajaja! El proper dia els faré amb iogurt grec a veure què tal...
Ah! I més fàcils impossible!!!
Ingredients (4 gelats):
- Un gotet de nabius
- 4 cullerades de postres de sucre
- 2 iogurts naturals

Preparació:
- Poseu els nabius en un cassó amb 2 cullerades de sucre i feu-ho coure a foc baix fins que el sucre es disolgui (uns 5 minuts).
- Ensucreu els iogurts amb les 2 cullerades de sucre restants.
- Alterneu capes de iogurt i de nabius (i el suc que hauran soltat durant la cocció) dins els motllos de gelat. Poseu-los els pals i deixeu-los al congelador unes 4 hores.
Bé, moltes gràcies per passar-vos per aquí! A veure si amb la tornada a la "normalitat", també torno al ritme habitual de publicacions!!
-----
Oh my gosh... I can't believe it... summer is over... it's gone so fast...
Yep, Monday I'll be back to work after almost 8 months of maternity break!!! :(
And I'm trying to sweeten my last weekend of "freedom" with some popsicles... using the blueberries we picked up ourselves during holidays!

You'll find dozens of recipes on the Internet to make these popsicles. I've used plain yogurts and we've find them gorgeous, but I'll try with greek yogurt next time.
Oh! And it can't be easier to make them!!
Ingredients (4 popsicles):
- 1/2 cup blueberries
- 2 tbsp sugar
- 2 plain yogurts

Instructions:
- Place blueberries and 1 tbsp sugar in a small saucepan. Cook at low heat until sugar dissolves (about 5 minutes).
- Sweeten the yogurts with the remaining tbsp of sugar.
- Place layers of yogurt and cooked blueberries inside popsicle moulds and let froze for about 4 hours.
Thanks so much for your visit! From now on, I hope I'll be back to the weekly post rate!!
dijous, 31 de juliol del 2014
El repte Pinterest: collaret de boles de fusta / The Pinterest challenge: wooden beads necklace
M'ho hauria d'haver imaginat... no podia ser tan fàcil...
Tenia tots els materials necessaris (cosa rara!) i vaig acabar el collaret en cosa de mitja horeta o tres quarts...
Ara, a partir d'aquí, l'intent de participar en #elretopinterest del mes de juliol que proposava Scarlata & el Señor Don Gato, va ser un desastre darrera l'altre!
Quan vaig acabar la "sessió fotogràfica" em vaig adonar que, entre els nombrosos "despistes" d'aquest any a l'hora de fer la maleta, havia oblidat el lector de targetes de la càmera... així que no em va quedar més remei que repetir les fotos amb el telèfon mòbil...

Però amb la poca cobertura de mòbil que tinc per aquí dalt i que no hi havia manera de connectar a la Wifi del càmping, enviar-me les fotos per correu i pujar el post ha estat una odissea! Això em passa per esperar a darrera hora... ainss! :P
Total, que ahir no vaig poder penjar el post que tenia preparat... ni participar en el repte... però no penseu que us estalviareu de veure la feina feta... aquí teniu els resultats finalment!!!

Pel collaret només necessiteu les boles de fusta, una mica de pintura acrílica (jo li vaig donar dues mans) i cordill de cuir. Ah! També vaig utilitzar una mica de cinta de pintor per facilitar la feina de pintar les boles sense "sortir-me de la ratlla"!
A veure si el mes vinent m'hi poso abans!!!
-----
I should have known better... It couldn't be that easy...
I had all the materials at hand and I finished my necklace in less than an hour...

But from then on, my participation in The Pinterest Challenge hosted by Scarlata & el Señor Don Gato was a total disaster!
After taking dozens of photos I realized I had forgotten at home the device I use to transfer the photos to my iPad... So I had to take them again with my cell phone...
But with a poor data mobile connection and the failure of the free Wifi connection in our campsite, there was no way of uploading my post! That's what happens when you wait until the last minute to do "your homework"! :P
So I lost the chance to participate in the challenge... but here I go anyway!!!

You'll only need some wooden beads, acrylic paint (two coats) and some leather strap or string. And you may want to use too some washi tape to cover the area you don't want to paint (it makes the painting job much easier)!
Thanks for your visit!!!
dijous, 10 de juliol del 2014
Regal "craftero" i resultats del sorteig / Crafter gift and giveaway winner
Aquesta setmana és l'aniversari de la meva germana (FELICITATS!!!!!) i, tan bon punt vaig llegir aquest post de Repeat crafter me, vaig veure claríssim quin regal li faríem. Fa uns mesos que em va demanar que li ensenyés els punts més bàsics de ganxet, perquè li volia fer un barret al meu nebodet, i ha acabat tan "enganxada" al ganxet que ara fa barrets i amigurumis per encàrrec i tot!!
Aquí teniu unes fotos del regal i una prova de la traça de la meva germana: mireu quin MIC més xulo!!!


Per altra banda, avui ja és dia 10 i, tal com vaig prometre, toca publicar el resultat del sorteig dels posagots de ganxet! Per triar la guanyadora, he utilitzat els serveis de random.org, i aquí teniu el número de comentari seleccionat:

Així que Susana, felicitats!!! De seguida tindràs a les teves mans el teu regal:

Moltes gràcies a totes les participants!
-----
This week we'll celebrate my sister's birthday (HAPPY BIRTHDAY!!!!) and, as soon as I read this post from Repeat crafter me, I saw crystal clear the gift we were going to give her: a yarn cake!! A couple of months ago, my sister asked me to show her the basics of crochet and by now she's so addicted to it that she even has quit sleeping! LOL
Here you have the yarn cake and an amigurumi made by my sister: a wonderful MIC puppet!!


On the other hand, here you have the winner of the watermelon shaped crochet coasters (chosen with random.org):
So congratulations Susana, the coasters will be in your hands in no time!

Thank you very much to all the contestants!
dissabte, 5 de juliol del 2014
Funda de trapillo per l'iPad / XXL crochet iPad sleeve
És curiós... repassant les entrades del bloc he vist que només n'hi ha un parell de cosetes fetes amb trapillo... i això que va ser el trapillo el que em va fer tornar a aficionar al ganxet!
Va ser la meva mare la que em va ensenyar a fer ganxet, però d'adolescent el vaig deixar abandonat i no el vaig tornar a tocar fins que fa un parell d'anys buscava una manera de reciclar una pila de samarretes velles de la meva parella.
I tot i què en feines grans el trapillo pot arribar a donar una mica de guerra, pel fet de no ser un material gaire homogeni, jo el trobo d'alló més agraït, sobretot perquè les feines avancen super-ràpid!!! Com aquesta funda per a l'iPad, que es fa en un moment.

I a vosaltres, us agrada treballar amb trapillo?
Per cert! Aprofito per recordar-vos que encara arribeu a temps de participar al sorteig per celebrar les 10.000 visites del blog!!!
Materials:
- Trapillo
- Agulla de ganxet de 10 mm
- Agulla de tapisser per rematar
Abreviatures:
- cd - cadeneta
- pr - punt ras
- pb - punt baix
- pa - punt alt

Patró:
- Volta 1: Feu 15 cadenetes. Feu 1 pb a la segona cadeneta, 1 pb a cadascuna de les 12 cd següents i 3 pb a la darrera cd. Continueu treballant al voltant de les cadenetes fent 1 pb a l'altra banda de les 12 següents cadenetes i dos més a la darrera (on ja hi ha el pb inicial) (30). Tanqueu amb un pr i feu una cd.
- Voltes 2 i 3: Feu 1 pb en cada punt (30). Tanqueu amb un pr i feu una cd (dues al final de la volta 3).
- Volta 4: Treballant només al llaç posterior, feu 1 pa a cada punt (30). Tanqueu amb un pr i feu una cd.
- Volta 5: Treballant només al llaç posterior, feu 1 pb a cada punt (30). Tanqueu amb un pr i feu una cd.
- Voltes 6 a 15: Treballant el punt sencer, feu 1 pb en cada punt (30). Tanqueu amb un pr i feu una cd (dues al final de la volta 15).
- Volta 16: Treballant només al llaç posterior, feu 1 pa a cada punt (30). Tanqueu amb un pr i feu una cd.
- Volta 17: Treballant només al llaç posterior, feu 1 pb a cadascun dels primers 5 punts; feu 5 cd; deixeu els següents 5 punts sense treballar; feu 1 pb a cadascun dels 10 punts següents; feu 5 cd; deixeu els següents 5 punts sense treballar; feu 1 pb a cadascun dels darrers 5 punts (30). Tanqueu amb un pr i feu una cd.
- Volta 18: Treballant el punt sencer, feu 1 pb a cadascun dels primers 5 punts; feu 6 pb sobre les cadenetes de la volta anterior (per formar una nansa); feu 1 pb a cadascun dels 10 punts següents; feu 6 pb sobre les cadenetes (per l'altra nansa); i feu 1 pb a cadascun dels darrers 5 punts (30). Tanqueu amb un pr i remateu.
Gràcies per la visita!
-----
It's weird... I went back to crochet after a looong time thanks to XXL yarn, but I've posted very few entries about it!
My mother taught me to crochet when I was a child. But I gave it up as teenager and I didn't go back to it until a couple of years ago, when I was looking for a way to recycle some old T-shirts.
I love how fast it is to work with XXL yarn. Like in this iPad sleeve, which can be done in an hour or less!

Do you like to crochet with XXL yarn?
Let me remind you that the giveaway to celebrate the 10.000 visits of this blog is still open!!!
Materials:
- XXL crochet yarn
- 10 mm size crochet hook
- Tapestry needle to weave in ends
Abbreviations:
- ch - chain
- sl - slip stitch
- sc - single crochet
- dc - double crochet

Pattern:
- Round 1: chain 15; 1 sc in second chain; 1 sc in the following 12 chains; 3 sc in the last chain. Go on crocheting around the opposite side of the chain: 1 sc in the following 12 chains; 2 sc in the last chain (30). Join with a sl and chain one.
- Rounds 2 and 3: 1 sc in every stich (30). Join with a sl and chain one (chain 2 at the end of round 3).
- Round 4: Working only in the back loop, crochet 1 dc in every stitch (30). Join with a sl and chain one.
- Round 5: Working only in the back loop, crochet 1 sc in every stitch (30). Join with a sl and chain one.
- Rounds 6 to 15: 1 sc in every stitch (30). Join with a sl and chain one (chain 2 at the end of round 15).
- Round 16: Working only in the back loop, crochet 1 dc in every stitch (30). Join with a sl and chain one.
- Round 17: Working only in the back loop, crochet 1 sc in every one of the first 5 stitches; chain 5; skip the following 5 stitches; crochet 1 sc in every one of the following 10 stitches; chain 5; skip the following 5 stitches; crochet 1 sc in every one of the following 5 stitches (30). Join with a sl and chain one.
- Round 18: crochet 1 sc in every one of the first 5 stitches; crochet 6 sc over the chains (to make the first handle); crochet 1 sc in every one of the following 10 stitches; crochet 6 sc over the chains (to make the second handle); and crochet 1 sc in every one of the last 5 stitches (30). Join with a sl and weave in ends.
Thanks for your visit!!
dilluns, 30 de juny del 2014
Posagots de ganxet i sorteig per les 10.000 visites / Crochet coasters and 10.000 visits giveaway
Doncs si, sembla mentida però el blog és a punt a punt d'arribar a les 10.000 visites!!!!
I com tot el mèrit és vostre, us ho vull agrair amb un petit regal d'allò més estiuenc: aquest joc de 6 posagots de ganxet amb forma de síndria!
Si us agraden, només heu de deixar un comentari en aquesta mateixa entrada amb el vostre correu electrònic abans del 8 de juliol i el dia 10 publicaré una entrada amb el guanyador o guanyadora (em sap greu, però el regal només s'enviarà a adreces espanyoles).

I, per si us en voleu fer un joc vosaltres mateixos/es, aquí teniu el patró: facilíssim!
Materials:
Abreviatures:
Patró:
Sort i fins el dia 10!

I can't believe it... the blog is just about to reach 10.000 visits!!!
And I would like to say thank you with this little summery gift: 6 watermelon shaped crochet coasters!
If you like them, you only need to leave a comment in this post with your e-mail address before the end of July, 8th. On July, 10th I'll post the name of the winner which will receive the coasters by snail mail (I'm sorry, but I'll send only to spanish post addresses).
But, if you wanna make your own coasters by yourself, here you have the pattern: easy-peasy!
Materials:
Abbreviations:

Pattern:
Good luck and see you on the 10th!
Subscriure's a:
Comentaris (Atom)