dijous, 21 de novembre del 2013

CAL Manteta Vasarely #16 / CAL Vasarely blanket #16

Definitivament... això és una "catacombe"! :P

A aquestes alçades del CAL ja hauria de tenir tots els rombes units i hauria d'estar teixint la vora de la manta... però, com podeu veure, amb prou feines n'he cosit la meitat...


És el problema que tinc... sempre em planifico fer moltes més coses del que és viable fer en el temps lliure que tinc... a vosaltres no us passa??

Bé, la qüestió és que si vull acabar la manteta en el termini previst (el proper 21 de desembre!), més val que m'hi posi seriosament!!

Apa, vaig a veure com ho porten la resta de companyes! Gràcies per la visita!!

-----
Definetely... that's a disaster!! LOL

By now I should have joined all my diamonds and I should have started to crochet the edge of my blanket... but, as you can see, I've scarcely sewn together half of the diamonds...

That's my problem... I always plan to make more projects than I can really fulfill in the freetime I have available... Does it happen to you too??

Well, the point is that, if I want to finish the blanket by the due time (December, 21st), I'd better start working harder on it!!!


Ok, I'll go to have a look at how are the CAL colleagues doing! Thanks for your visit!

diumenge, 17 de novembre del 2013

La meva darrera adquisició / My last acquisition

Hola a tothom!

Aquesta setmana tinc un munt de projectes a mitges... un puf de trapillo pel menjador, el sonall de la granota Gustau que us comentava aquí, la decoració nadalenca... M'he de començar a organitzar ja!!! :P

Mentre no els acabo, us ensenyo la meva darrera adquisició:

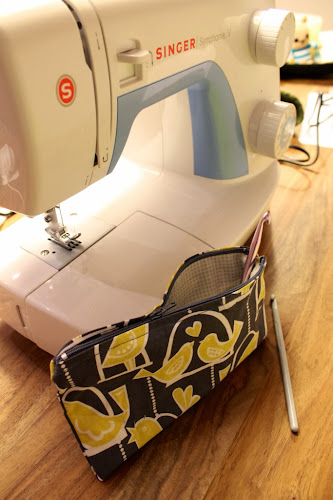
Si, si... vaig aprofitar la darrera oferta dels supermercats Aldi per comprar-me una màquina de cosir, per veure si així li trec profit al curs d'iniciació a la costura a màquina que estic fent al Centre Cívic Urgell de Barcelona.

L'estoig que veieu a la foto és el primer resultat del curs... està molt lluny de ser perfecte, però estinc aprenent moltíssim!

Fins aviat!

-----

Hello everybody!

This week I've got a lot of unfinished projects... one xxl crochet pouf for our living room, the Kermit the frog crochet rattle I told you about here, the christmas decor... I'd better start organising my time soon!!! LOL

While I finish them, let me show you my last acquisition:

Yes... A couple of weeks ago I bought a sewing machine! I'm trying to get the best of the sewing for beginners course I'm taking this autumn.

The little purse in the pictures is the first result of the course... It's pretty far away from perfection, but I'm learning a lot!!

See you soon!


diumenge, 10 de novembre del 2013

Galetes d'ametlla / Almond cookies

Ja fa dies que pensava en com utilitzar un paquet de farina d'ametlla que em voltava pel rebost... l'opció de fer-ne panellets estava descartada, perquè en això la meva mare en té l'exclusiva... els fa boníssims!!!


I de sobte vaig ensopegar amb aquesta recepta de galetes d'ametlla del bloc Manzana & Canela! Si us passeu per la seva entrada veureu que la recepta és senzillíssima (no us la copio perquè la trobareu en castellà al post original) i la veritat és que es fan en un moment!

A més, aquest post m'ha descobert el repte culinari que llença cada mes el blog Tía Alia Recetas... i ja tinc ganes de trobar una estoneta per participar-hi!!

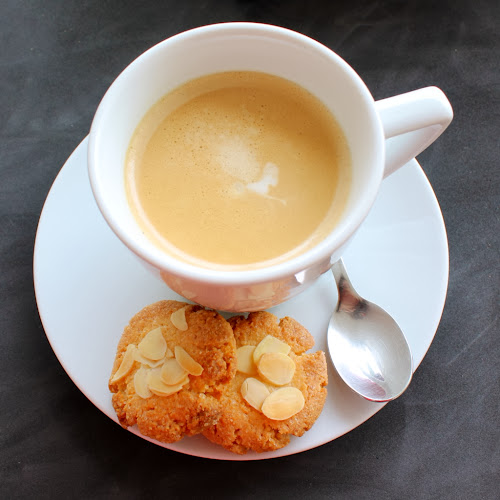
La qüestió és que aquestes galetes han quedat perfectes per acompanyar el café de la sobretaula o de mitja tarda... espero que us animeu a provar-les!!


-----

I've been wondering for days now which would be the best way of making use of a ground almonds pack stored in my pantry...


And suddenly, I've stumbled upon this almond cookies recipe from Manzana & Canela's blog! The recipe is extremely easy and takes less than half an hour to make!

Moreover, in that post I've discovered the cooking challenge hosted monthly by Tía Alia Recetas' blog... and I'm eager to find some time to participate!!

Well, those cookies will match perfectly your afternoon tea or coffee. Here you have the recipe, hope you like it!


Ingredients:
  • 125 g ground almonds
  • 125 g sugar
  • 3 egg yolks
  • laminated almonds
Instructions:
  1. Mix sugar and ground almonds.
  2. Whisk the egg yolks, saving about half a yolk, and add them to the previous mix until well combined.
  3. Make balls with bits of the dough, press them between your fingers and place them on a tray.
  4. "Paint" the cookies with the remaining egg yolk and place some laminated almonds on top of each cookie.
  5. Bake them for about 10 minutes at 180ºC (350F).
Thanks for you visit!

divendres, 8 de novembre del 2013

CAL Manteta Vasarely #15 / CAL Vasarely Blanket #15

Finalment he reprès la tasca d'unir rombes...

Com veureu a les fotos (disculpeu per la seva qualitat!), intento recuperar el temps perdut cosint al tren... que avui anava a rebentar, per cert! La gent em mira con si hagués perdut l'enteniment!! XDD


Bé, i la resta de companyes de CAL, com ho porteu??

Fins el dia 21!!

-----

Finally I've resumed the task of sewing diamonds together...

As you'll see in the pictures (please excuse for the low quality!), I'm trying to catch my CAL colleagues by sewing during my commutes...While people looks at me as I've gone mad!! LOL


And what about the rest of my CAL colleagues? How are you doing??

See you again on the 21st!!

diumenge, 3 de novembre del 2013

Olives casolanes / Homemade preserved olives

No sé si us ho he comentat mai, però al pati de casa tenim una olivera jove, peró molt productiva. La veritat és que no sé exactament de quina varietat és... potser manzanilla o hojiblanca... ni idea... Però la qüestió és que ben arreglades són boníssimes!

Per la conserva faig servir la tècnica que m'ha ensenyat la meva mare, que és la que ja feia servir la meva àvia paterna. Aquí la teniu...


Ingredients:
  • Olives verdes
  • Aigua
  • Herbes aromàtiques: farigola, romaní i fenoll (tot i què les podeu variar al vostre gust)
  • Sal
  • Llimones
  • Alls
Preparació:
  1. Comenceu per partir les olives (si trieu olives d'una varietat petita, com arbequines, us podeu estalviar aquest pas) i poseu-les en aigua. Aneu canviant l'aigua de les olives cada dos dies durant un període de 2-3 setmanes (quan en tastar-les hagin perdut l'amargor, ja les teniu a punt).
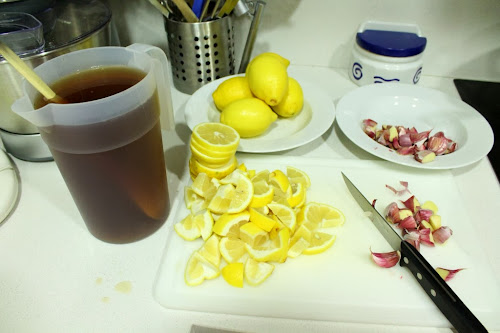
  2. Quan les olives estiguin a punt per adobar, poseu les herbes aromàtiques en abundant aigua bullint durant 2 o 3 minuts. Apagueu el foc i deixeu refredar (el millor és deixar-ho en repós tota una nit).
  3. L'endemà coleu l'aigua i afegiu 80 g de sal per cada litre, remenant fins que es dissolgui completament.
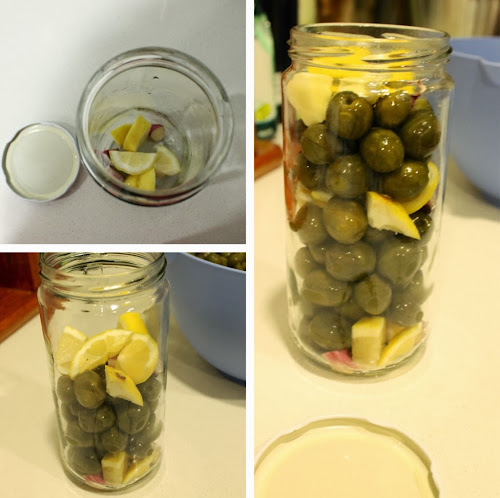
  4. Ja podeu anar posant les olives en pots de vidre (no és imprescindible esterilitzar-los) així: 2-3 trossets d'all cru i 3 trossets de llimona al cul del pot, olives fins a la meitat, un altre cop els mateixos trossets d'all i llimona, olives fins que falti un dit per arribar al broc del pot i un tall de llimona a sobre.
  5. Ompliu els pots amb la infusió amb sal i tapeu-los. Les olives estaran a punt al cap d'un mes, aproximadament.
Espero que us agradin!

-----

Have I told you that we have a young olive tree in our garden? Actually I'm not sure which kind of olive tree it is exactly, but it yields a pretty big amount of delicious olives, once preserved!
To preserve them I use the technique my mother has teached me, which she learned from my father's mum. That's how...
Ingredients:
  • Green olives
  • Water
  • Herbs: thyme, rosemary and fennel
  • Salt
  • Lemons
  • Garlic
Instructions:
  1. Start by making a lengthwise cut with a knife in every olive (you don't need to do that if you choose a small sized kind of olive) and place them in water. Change the water every two days during the following 2-3 weeks (until they lose their bitter taste).
  2. When you find the olives ready to preserve, place the herbs in plenty boiling water for 2-3 minutes. Let the water cool (better overnight), without removing the herbs from it.
  3. Strain the water and add 80 g of salt for every liter of water, until completely dissolved.
  4. Take some mason jars and fill them this way: put 3 little pieces of lemon and 2-3 half clove of garlic pieces in the bottom of the jar; add olives until the middle of the jar; put the same number of lemon and garlic pieces; add olives to the top and a lemon slice.
  5. Fill the jars with the salted water and close them with their lids. The olives will be ready one month later, approximately.
Hope you like it!