diumenge, 16 de març del 2014

Moltes gràcies!!! Thank you very much!!!

Aquesta setmana tenim un munt de coses per celebrar...

Avui en Guim fa un mes i no volia deixar passar el dia sense donar les gràcies a tots els que ens heu fet arribar les vostres felicitacions!!! Tenia intenció de penjar fotos dels regalets que li heu fet, però la veritat és que són tants que encara no he pogut fer fotos de tots (no sé que passa que darrerament em falten mans! XD) i, de fet, el més important és que li han agradat moltíssim i que demostren que tenim els millors familiars, amics i companys de feina... Moltes gràcies a tots!!!!

Per una altra banda, dilluns passat va fer un any que vaig publicar la primera entrada en aquest blog... un any ja!!! Ostres... m'ha passat volant!!! Des del principi que això del blog m'ho vaig plantejar com un simple entreteniment, una manera de combinar algunes de les coses que més m'agrada fer: les manualitats (sobretot el ganxet i la cuina), la fotografia i practicar l'anglès. Però he de reconèixer que no m'imaginava que esperaria amb tantes ganes aquesta cita setmanal. I, a més, ha estat una sorpresa d'allò més inesperada rebre gairebé 8.000 visites en aquest temps...

8.000 gràcies a vosaltres que us heu aturat a passar una estoneta per aquí!!!

-----

This week we have a lot of things to celebrate...

Today it's been a month since my baby boy was born, and I couldn't miss the chance to thank everybody who has sent us their congratulations!!!! I had in mind to post pictures of all the presents we've received, but they're so many that I still haven't got the time to shoot all of them! And, actually, the most important is that he's loving all of them and that they demonstrate we're so lucky to have the best family, friends and colleagues... Thank you very much!!!!

On the other hand, last Monday it was one year since I first posted in this blog... One year already!!! From the very beginning I planned this blog to be a pure and simple entertainment, a way to combine some of the things that I enjoy the most: crocheting and cooking, fotography and improving my English skills. But I must admit I had no idea I was going to enjoy this weekly meeting as much as I do. And, on top of that, reaching almost 8.000 visits... I have no words...

Thank you very much to all of you who have spent your time here!!!


dissabte, 8 de març del 2014

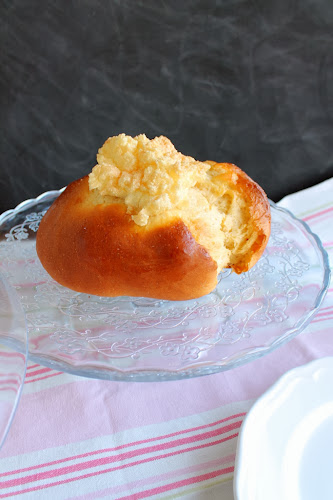
Mona valenciana / Valencian Easter's bread

Una de les coses que més recordo de quan anavem al poble del meu pare, que és valencià, és la mona que preparen bàsicament per Pasqua... De fet, va ser tot un descobriment assabentar-me que en un forn de pa de Sabadell en preparen una versió gairebé idèntica sota el nom de pa cremat. Fins i tot el meu pare reconeix la semblança entre tots dos!!!

Ara... encara ha estat millor descobriment trobar per casualitat el blog Decogalletas, farcit de receptes valencianes tradicionals, inclosa la mona!!!!

Així que, com us podeu imaginar, no he pogut resistir la temptació de fer-la! Ara, us he de confessar que m'han fet falta dos intents per assolir l'èxit... El primer cop ho vaig provar amb llevat liofilitzat del que faig servir per fer pa amb la panificadora, però suposo que devia calcular malament en convertir el pes de llevat fresc a sec, perquè la massa gairebé no va pujar després de gairebé 5 hores de repós... ejem...

Not 2 late to craft: Mona valenciana / Valencian Easter's bread

O sigui que vaig anar corrents al súper a buscar llevat fresc (em va deixar parada la quantitat que fa falta!!) i m'hi vaig tornar a posar... però amb fent una mica de "trampa" per assegurar-me el tret... Per a la barreja dels ingredients i el llevat de la massa vaig usar el programa d'amassat i llevat de la meva panificadora! La massa va pujar extraordinàriament i en menys de la meitat de temps ja la tenia a punt per fornejar!!

La panificadora és una d'aquestes bàsiques comprada al Lidl després de molt donar-li voltes (sobretot per l'espai que ocupa a la cuina!), i us he de dir que n'estic encantada!

Però bé, tornant a la mona, per fornejar-les vaig dividir la massa en tres parts... dues es van quedar a casa i la tercera la vaig portar a un berenar... i totes tres van desaparèixer en un moment!! La veritat és que aquesta mona fa un esmorzar o berenar espectacular acompanyada amb un cafè amb llet o una tassa de xocolata!! :)

Not 2 late to craft: Mona valenciana / Valencian Easter's bread

Bé, a part de la "trampa" d'usar la panificadora, he seguit fil per randa les instruccions de la recepta original, que no us transcric perquè la trobareu en castellà aquí. Només us he d'advertir que jo vaig espolvorar el sucre abans d'enfornar-les i que vaig haver d'escurçar el temps de fornejat a uns 20 minuts, enlloc de 35, per a què no es cremessin!

Espero que us animeu a provar-la!!

-----

One of my most vivid childhood memories is the bread we ate during Easter in my father's hometown... Actually, it filled me with joy to find out that a bakery in the town where we live (almost 500 km apart) prepares this same kind of bread (although under a different name)!

But... it's been even better to find the original recipe of this kind of bread in the blog Decogalletas!!

As you may imagine, I ran to prepare a batch! But, the truth to be told, I needed two attempts to reach a success... For the first batch I used the active dry yeast I use to make bread with my bread making machine, but I did something wrong... because the dough failed to rise as expected, even after 5 hours... ejem...

Not 2 late to craft: Mona valenciana / Valencian Easter's bread

So I ran to buy fresh yeast (I'm still astonished by the amount needed...) and tried it again... but with a little "trick"... To mix the ingredients and for the rising of the dough, I used my bread maker! The dough rose extraordinarily in half the time and I got enough to bake 3 breads!!

This bread is excellent as a breakfast or for tea-time, with some coffee or hot chocolate... You must try it!!

Ingredients:

  • 500 g bread flour
  • 125 g sugar
  • 125 g fresh yeast
  • 1 dl olive oil
  • 3 eggs + 1 egg white

Instructions:

  1. Mix all the ingredients (but the spare egg white) in a bowl, cover it with a tea towel and let rise in a warm place for about 4 hours... Or, like me, let your bread maker do the mixing and rising job for you!! LOL
  2. Make 3 or 4 portions from your dough. Shape a ball with each portion and let rise again for an hour.
  3. Make a cross cut with a knife on top of each bread. Beat the spare egg white until stiff and put some of it in top of each bread.
  4. Spread some sugar over each bread and bake at 180ºC (350 F) for about 20 minutes.
Not 2 late to craft: Mona valenciana / Valencian Easter's bread


diumenge, 2 de març del 2014

Mirall DIY pel rebedor / DIY mirror for the entryway

I aquí teniu un altre dels projectes que tenia a mitges des de fa la tiiiiira... De fet, ja us vaig parlar del tema en el post d'aquests cistells de ganxet fa gairebé un any!!!

Em passa sovint, que enceto un munt de coses i després em costa rematar... què hi farem!! :P

La qüestió és que ja fa temps que volia posar un mirall al nostre rebedor i alhora trobar alguna solució per tenir a mà les claus i altres coses de l'estil, però que ocupes molt poc espai perquè el nostre rebedor és molt mini...

Not 2 late to craft: Mirall DIY pel rebedor  / DIY mirror for the entryway

Per si voleu fer-ne un de semblant, aquí us deixo els materials i procediment que hem seguit...

Materials:

  • Un mirall (en el nostre cas de 60x75cm) i els seus suports, nosaltres el vam comprar al Leroy Merlin
  • Un llistó de fusta d'abet sense tractar, comprat al mateix lloc i de, com a mínim 1,5m de llargada
  • Betum de Judea
  • 3 penjadors, nosaltres els vam comprar al Tiger
  • 3 cistells com els que us explicava aquí
  • Serra, trepant, paper de vidre i cola per enganxar els llistons al mirall

Procediment:

  1. Talleu dos trossos de llistó de 75 cm de llargada.
  2. Poliu tots els costats dels llistons amb paper de vidre.
  3. Tenyiu els llistons amb betum de Judea (diluït en aiguarràs), per a què agafin un aspecte de fusta envellida.
  4. Cargoleu els 3 penjadors en un dels llistons.
  5. Pengeu el mirall i enganxeu els llistons a la part superior i inferior, de manera que els suports del mirall quedin amagats a sota (jo vaig haver de fer unes mossegades a la part posterior dels llistons, perquè els nostres suports sobresortien una mica del mirall).
  6. Espereu el temps d'assecatge indicat per la cola i ja podeu penjar els cistells als penjadors i començar a fer servir el vostre mirall!!
Not 2 late to craft: Mirall DIY pel rebedor  / DIY mirror for the entryway

Consti que en aquest projecte vaig tenir la inestimable col·laboració de la meva parella... jo amb la serra i el trepant sóc un zero a l'esquerra!! :P

Què us sembla??

-----

And here you have another project I've been postponing for months... Actually, I already told you about it in this post about my twine crochet baskets almost one year ago!!!

It happens to me all the time... I start a dozen different things at the same time and then I seem unable to finish any of them... LOL!!

Not 2 late to craft: Mirall DIY pel rebedor  / DIY mirror for the entryway

The thing is that I wanted a mirror for our entryway and some solution to store our keys and other little things, but taking into account the tiny size of our entryway...

Just in case you would like to make something similar, here you have the materials we used and how we proceeded.

Materials:

  • A mirror (ours is 60 x 75 cm) and its supporting elements
  • An untreated fir wood strip, at least 1,5 m long
  • Wood stain
  • 3 hangers
  • 3 crochet baskets as the ones I showed you here
  • A saw, a drill, sandpaper and glue

Instructions:

  1. Cut two pieces 75 cm long from the wood strip.
  2. Sand all the surfaces of the wood pieces until you get a smooth finish.
  3. Stain the two pieces of wood.
  4. Fix the 3 hangers in one of the stained pieces of wood.
  5. Hang the mirror in the desired place and glue the two pieces of wood so the supporting elements of the mirror remain hidden beneath the wood strips.
  6. Wait until the glue hardens, and you're ready to hang the crochet baskets and start using your mirror!!

I must say I had some (much!) help of my partner in this project... because I seem to be useless when it comes to using a saw or a drill!! LOL

Not 2 late to craft: Mirall DIY pel rebedor  / DIY mirror for the entryway

What do you think about it??